I have not seen any complete step a – z rear sunshade retrofit guides and decided to post this DIY outlining how I installed an electric rear sunshade assembly into my ZHP sedan and make this guide so that anyone could follow this to install an electric rear sunshade into a coupe. One thing to note is that sedans have an outline molded onto the back of the rear parcel deck shelf so it is very easy to cut out whereas on coupes the outline is drawn so it might not be complete. I will add there have been videos on how the retrofit is done on sedans and coupes however they do not detail now to run wiring from the rear passenger side of the deck shelf to the back of the center console switch unit where the wiring plugs into, and those DIYs don’t tell you what you need to source by part numbers whereas this one does.
Disclaimer: By using this DIY on your BMW, I am in no way held responsible for any mishap you may incur while working on your car. You accept full responsibility for your BMW when using any portion of this DIY.
Parts List:
The following will be needed to install the electric rear sunshade assembly into your coupe or sedan:
- 51-46-8-202-185: Sun Blind (electric sunshade assembly for sedan)
- 51-46-8-223-046: Sun Blind (electric sunshade assembly for coupes)
- 67-65-6-916-270: Motor used for electric sunshade (coupes and sedans)
- 51-46-8-218-275: End Caps for electric sunshade (Left side)
- 51-46-8-218-276: End Caps for electric sunshade (Right side)
- 61-31-6-925-512: Center Console Switch Unit w/ elec sun shade button (coupes and sedans)
- 07-14-9-149-399: Fillister Head Screw (you need 3 to secure the sunshade assembly to the rear parcel shelf)
- 61-31-6-925-512: Switch Unit (heated seats/DSC/HK Stereo/TPMS/Sun Shade)
- 51-46-8-218-275: SunBlind Rear Covering (left)
- 51-46-8-218-276: SunBlind Rear Covering (right)
- wiring needed for the wiring harness you need to make (about 13 foot of cabling - measure for a more accurate application for your car)
- pins that fit inside the plug that connects to the back of the switch module at the center console just above the ash tray
- Fresh cutting disks for Dremel (if used for this retrofit)
- Roll of duct tape
Notes:
The rear sunshade assembly can be purchased hence the part numbers listed above or you can try sourcing them thru other means. In my case, I sourced a complete rear sunshade assembly thru eBay and got mine from Riga, Latvia. I paid $200 for my sunshade assembly shipped so no complaints. Brand new you will pay just over $700 for the sunshade assembly w/o motor, the motor will cost you another $250. These pop up on eBay as a complete unit from time to time from Europe.
The switch unit that houses the Heated Seats, DSC, TPMS and Sunshade switches however, do not pop up on eBay nearly as often, if ever, so I sourced mine from ECS Tuning for $258.24 rather than wait for a used one to pop up on eBay. Other items that I needed to source were fresh cutting disks for my Dremel so I can make the cut needed to fit the sunshade assembly into the rear deck shelf. I also purchased matte black fabric spray paint so that I could properly refresh the deck shelf while it was out.
Preparation is key to an OEM finish when done with this retrofit. After making the necessary cut on the rear deck shelf, I recommend taking some duct tape and go over the surface of the deck shelf to remove any loose debris from the surface before refreshing it using the matte black fabric spray paint. The finish will come out so much better if you take the time to clean off the rear shelf.
Process:
- RUNNING THE WIRING HARNESS
1. Making the wiring harness. You are running a new wiring harness (two wires) from the back of the rear deck shelf to the back of the center console switch unit so making a wiring harness with some excess length is better than coming up short. I made mine about 13 feet in length then used BMW Cloth tape to make my wiring harness as close to OEM looking as I could. When done it will look something like this:
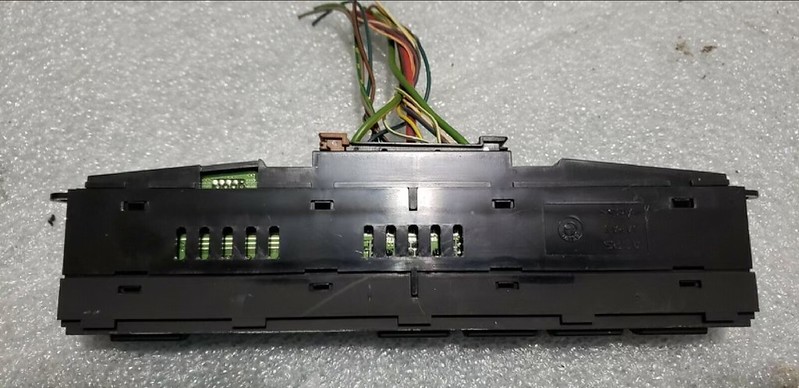
In order to get the proper fitting pins needed to insert into pins 14 and 15 on the plug side of the wiring harness I sourced another switch module which had the plug and wiring that was cut from the car it was installed in just so I could reuse the pins needed for this retrofit. I am not sure the exact part number for these pins so for me it was just easier to source a module with the plug intact to pull the necessary pins from.
So after I got the pins I wanted this is how it looked... I also got a third wire out because I will also be retrofitting TPMS into my ZHP per Jon's (JupiterBMW) DIY.
2. Running the wiring harness into the car.
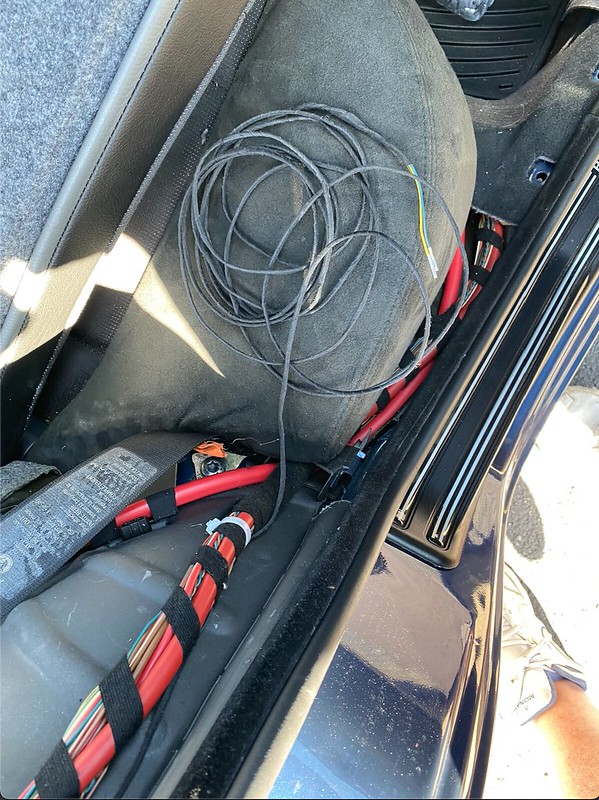
You can start at either end here. I chose to run mine from the back going to the front along the passenger side.
Pictured below is another angle showing how I'm running the wiring harness from top to the floor along with the existing wiring loom to the front.
I fed the wiring harness along the wiring loom behind the B-pillar covering and up to the glove compartment. Once I got to this point, I ran the wiring harness behind the trim and up and across under the fuse assembly over to the center console.
You can see by the yellow x's (in the picture below) how I ran my wiring loom over and across the glove compartment to the center console... this is also where I took up any extra slack in my wiring harness and looped it up.
The next part was to insert the wiring into pin 14 (yellow wire) and pin 15 (white wire) into the plug pictured below then close up the plug and then put everything back together.
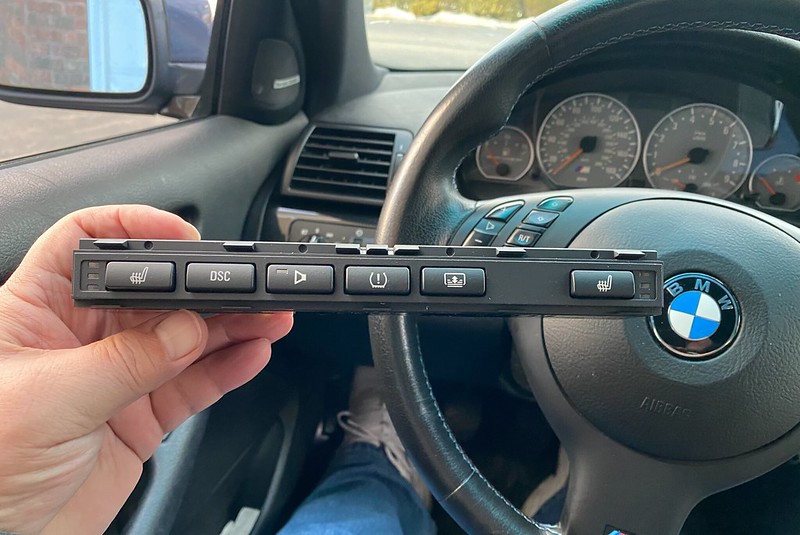
It is now time to add the new switch module to the car . . .
When you're done this is how it will look
Routing the rear sun shade wiring harness is now complete.
- MAKING THE CUT ON THE REAR DECK SHELF
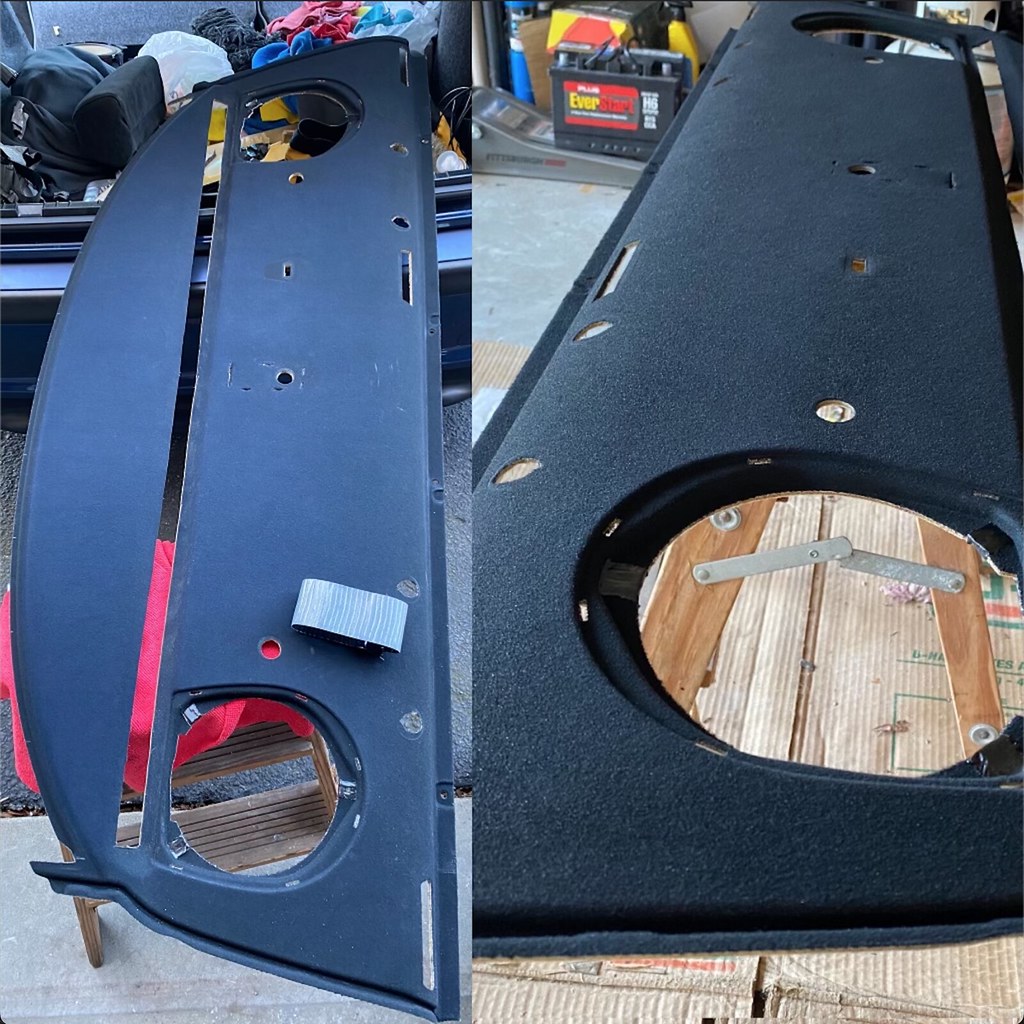
You're going to make a mess here. Do this in a ventilated area so you won't have to breathe the dust this will create when you are making this cut. Take your time as the rear deck shelf becomes real flimsy once the cut is made. You will see what I am talking about once you do this. Just take your time and be careful. While making the cut I found using my Dremel to be one of the easiest tools to do this.
On sedans the back of every deck shelf has a marking similar to what you see in the picture above where to make the cut for the rear electric sun shade assembly to fit into. All you have to do is just follow the line to make the cut. This is why I found using a Dremel with a fresh cutting disk to be very handy in this case. Keep in mind you're making this cut and on the other side is a fabric covering for the rear deck shelf... why taking your time making this cut is so important. You don't want to rip the material on the other side while making this cut. The Dremel seems to be the best tool for making a clean precise cut.
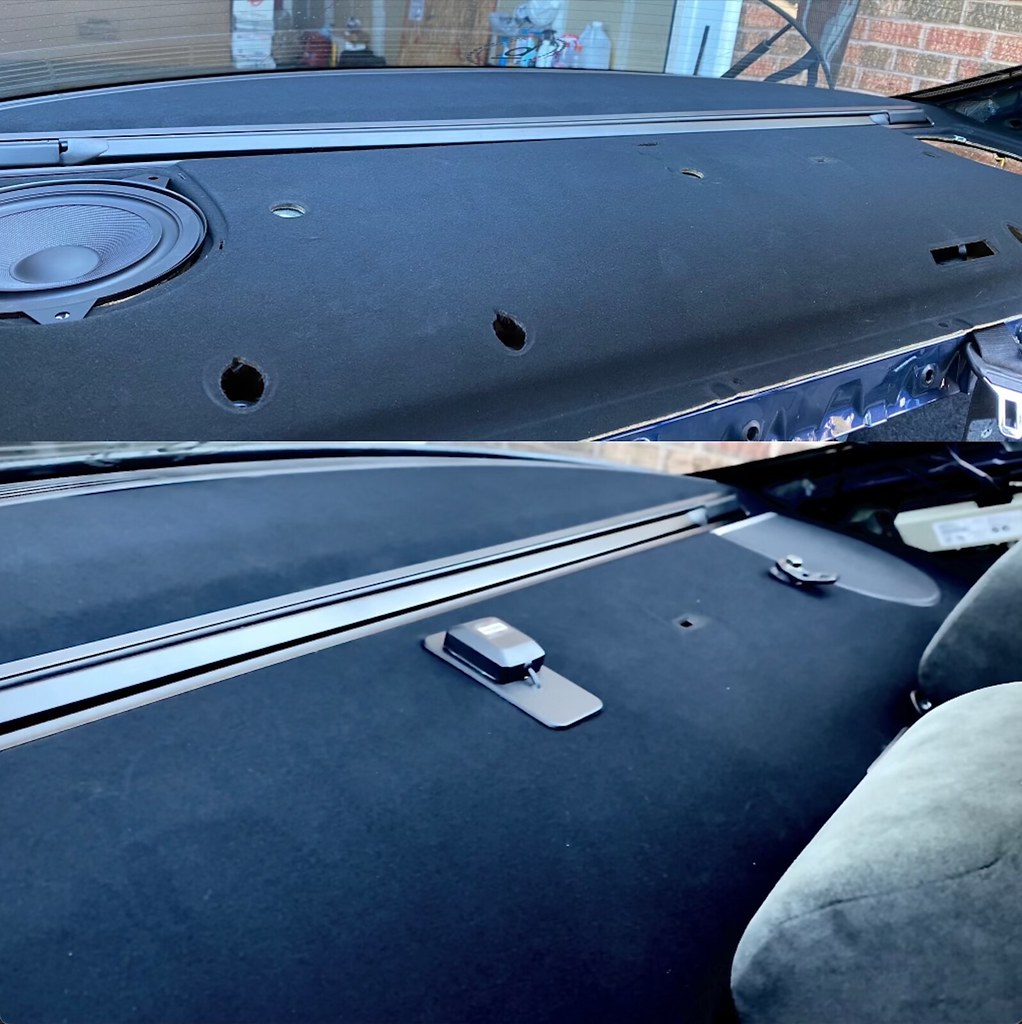
As you make the cut across the deck shelf it starts to bind just a little so I used some duct tape to secure the part that was cut to keep everything stable while making the rest of the cut. It worked out very well.Once the cut has been made use duct tape to go over the entire surface of the deck shelf to remove any dust and debris before respraying the deck using matte black fabric spray paint. The difference is huge as shown below.
- REFINISHING THE REAR DECK SHELF - INSTALLING ELECTRIC SUNBLIND
No more purple rear deck shelf.... When inserting the rear sunshade assembly into the rear deck shelf TAKE YOUR TIME fitting it into the shelf. It will fit in and you have to press the deck shelf into the grooves of the sunshade assembly and it will all fit in. Leave a little space on either side so lightly fit first then press in. You need to have even gaps on both edges so that the end caps will properly fit completing the look once installed.
You can see in the picture above the gap at the end I am talking about. This is where the end cap installs into.
When installed this is how the end caps look.
The end caps and part numbers for them:
- 51-46-8-218-275: SunBlind Rear Covering (left)
- 51-46-8-218-276: SunBlind Rear Covering (right)
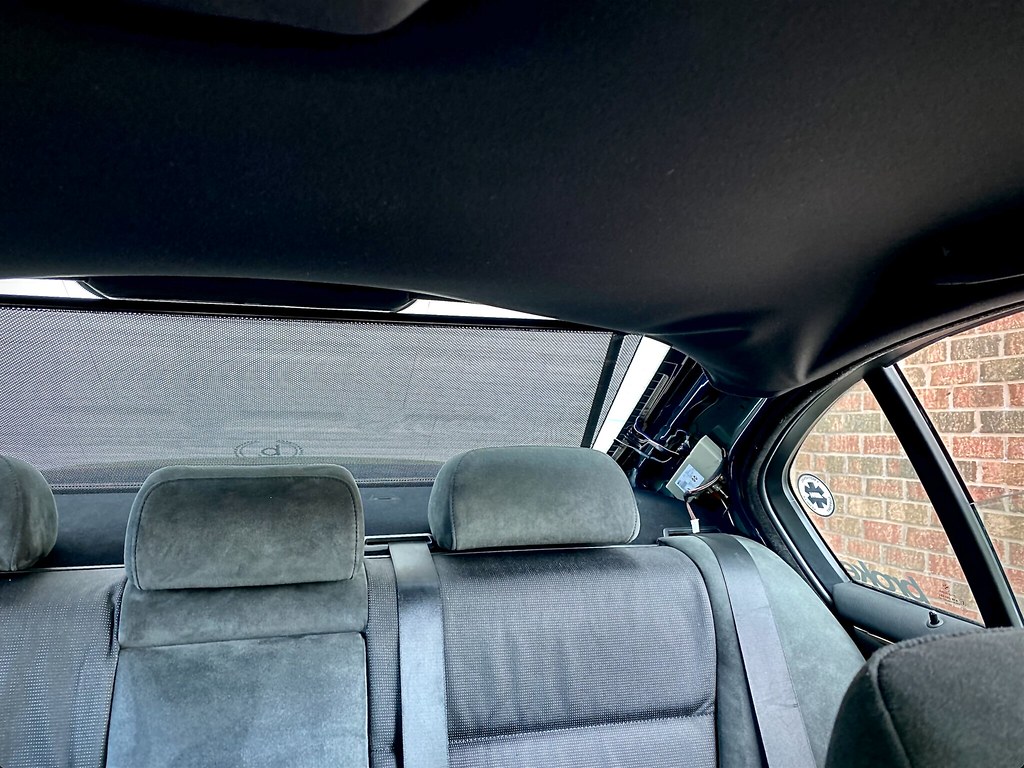
And that's pretty much it. Once you have it installed and everything has been connected you can use the sun shade button at the center console to raise and lower the rear sun shade. It is a nice option to have in places where you are not allowed to have window tint on your car.
- SECURING REAR SUN BLIND ASSEMBLY TO CAR
You will need three Fillister screws to secure the rear sun blind assembly to the car. As is, you are able to secure the sun blind assembly at the center screw as this is easily accessible. In order to do the driver's side and Passenger's side you will need to drop the rear subwoofer enclosures then you will have access to fully secure the rear sun blind assembly.
This is what the Fillister screws that are used to secure the rear sun blind look like.
- OPTION SETP
I left this part as the last part for this retrofit because you may need to or you may not need to do this. It all depends on the condition of your speaker grills in back. Also some have desired to make the bright silver Harmon Kardon strips black instead of bright silver to reduce the reflection of those strips on the rear glass... This is the time to do this. In my case I chose to refresh those strips to clean up everything back there.
The condition of my strips were so aweful that I could use a greenie (light abrasion cloth) and water to remove what was left on them to get them fully black...
This is what those strips look like with paint removed. They are plastic so be careful when removing paint from them. I used this paint when repainting my strips . . .
I had is around and figured why not? I liked the results.
- CONCLUSION and CREDITS
The end result is what I have been wanting for a daily driver sedan. The finish looks completely OEM and is a feature not many have on their E46 BMWs. I have found it very nice to have especially with idiots driving with their high beams on... this really does a great job reducing the glare. To me a worthwhile retrofit.
CREDIT: Shawn Robertson was very helpful to me in doing this retrofit to my ZHP. He has done this retrofit to his M3 Sedan and this is what gave me the idea of pursuing this retrofit. My thanks to Shawn for always getting back to me with the questions I have had.
It is my hope that those of you who do this retrofit to your BMWs will find this DIY guide helpful.













 Reply With Quote